Showing posts with label Soft Slab. Show all posts

Saturday, May 30, 2015

Soft slab principles of design


  •  form - overall shape of the ceramic piece makes a head
  • emphasis - attempt to emphasize the nose and tongue by making it a contrasting, light color compared to the rest of the mug
  • balance - the parts of the mug balance each other to form a proportional cartoony face
  • value - used different color glazes


  • form - made the mug a slanted shape
  • emphasis - emphasized the handle (much lighter color)
  • proportion - the leaves were in proportion to the vine
  • rhythm - lines and vines (haha rhyme) creates a unique rhythm or movement in this mug


  • pattern - made small and large circles, made thick and thin coils, and repeated that throughout the entire mug
  • proportion/size - made a smaller mug inside the larger mug to create a contrast in proportion and size
  • texture through applicay - the surface of the mug is uneven
  • space - space between the mugs one inside of the other

Soft Slab 3rd Mug

For this last soft slab mug, I decided to make more of a pattern design. First, I rolled out a slab of clay  using the slab roller and used a circular object to trace the base. After that, I rolled out another slab of clay and cut a large strip of clay to make the body. I repeated that to make a smaller mug inside the larger mug. To attach the bases to the strips of clay, I scored and slipped them, then moved the clay around that area to get rid of the mark. I also scored and slipped the smaller mug onto the larger mug. But for those two mugs, I didn't completely join the ends together to make the body. I overlapped the ends of the clay to 
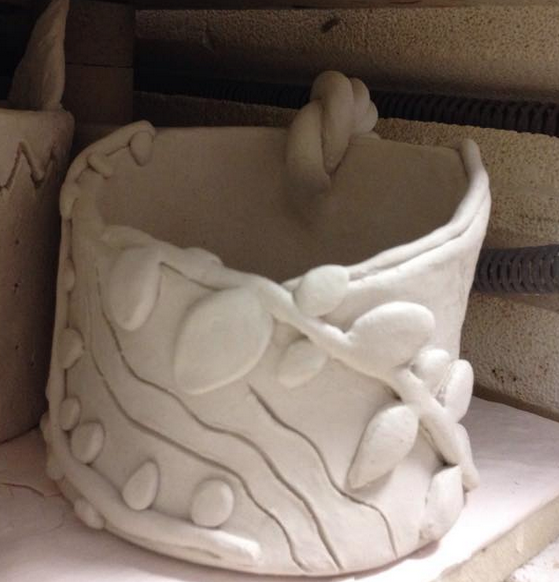
emphasize that area. To make my design, I pinched off peaces of clay and rolled them into balls. Then, I flattened them, and scored and slipped them onto the body of the mug. I repeated that to make other circular pieces of clay and used applicay. To seperate it from the other patterend design I made with strips/coils of clay, I rolled out thin coils to act as "barriers" between them. To create contrast, I made large and small circles and thick and thin coils. For the two handles, I rolled out two larger coils and stuck by scoring and slipping it on both sides of the mug. I used a sponge to smooth out the clay. I used a needle tool to remove bits and pieces of clay in gaps. I left this piece of greenware out to dry until it reached bone dry state, and then I fired it in the kiln.
(as you can see, as I was making this mug, I would put it on a banding wheel to make it easier for me to construct it)


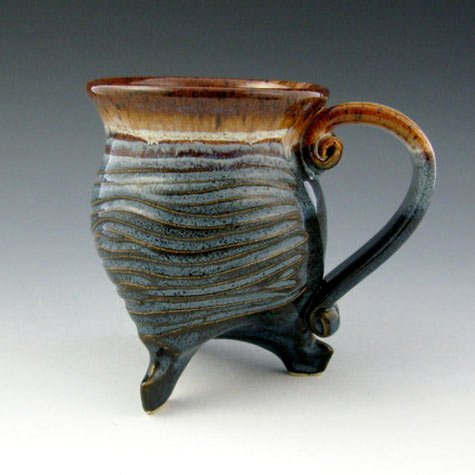
After it was fired, it became bisqueware. I put on glaze (the kinds of glaze I used you can see in my sketchbook) and aimed to create a reddish kind of piece. When I fired it a second time, I asked mr swinehart to prop up this mug because i was afraid that the glaze might flow. I didn't flow ( I think) so that was good.

My project kind of turned out the way I wanted. The colors didn't completely turn out the way I wanted it to, but it was somewhat similar to what i had in mind.

Tuesday, March 17, 2015

Soft Slab Process (March 17, 2015)

The second mug I created focused more on a nature theme. I wanted to create vines and have leaves. I also wanted to incise a tree. So I did just that.

First, I wedged a piece of clay, then I rolled a slab out with the slab roller. I used a needle tool to trace the net of the mug out. I wet it with water to prevent it from cracking, then I rolled it into the desired shape and size. I scored and slipped the sides together and moved the clay around in that area to remove the crack. Then, I rolled out another slab of clay to make the base. I traced the size of the mug's base onto the slab and cut it out using a needle tool. I scored and slipped that onto the mug and moved the clay in that area. I removed clay using a knife to create a slant in the mug. The top of the mug slants down then curves back up. I decorated my mug with vines. I rolled out a thin coil and scored and slipped it onto the mug. I created 3 of those "vines". Then, I added leaves to two of those vines. To make the leaves, I flattened a ball of clay and pinched the sides to make it pointy. I scored and slipped it on. For one of the vines with leaves, I smoothed it out with a wooden knife to make it "connected". Then, I incised a tree onto one of the empty places. I did it 3 times to try to get it right. Originally, I used a needle tool, but there were tiny balls of clay that would form. So, I used a pencil, but it was to thick. So I ended up using a knife first, then going over it with a pencil. It ended up better. Then, I added a whole lot of stripes. Originally, I had planned for it to only be in one area. But then, I went crazy with the striped lines and put them everywhere. Bad choice. I should have stuck with doing it in one place. Now, my mug's an eyeful. Oh well. Perhaps it will turn out better after I glaze it. (no it didnt)

This mug was made by adding clay and incising.


After it was fired in the kiln again, I glazed it. It didn't have enough layers of glaze, so it didn't turn out like the light color it was supposed to. The leaves turned out kind of black, when it was supposed to be more of a dark green kind of color. (99 percent of the time i ruin my project with glaze)


Tuesday, March 10, 2015

Soft Slab Process (March 10, 2015)

I made the body of my mug with a rolling pin. I wedged a ball of clay and rolled it into a ball. Then, I stuck a rolling pin through the clay, and rolled it until the walls of the mug were even and of good thickness. I cut of any excess clay. I rolled out a slab of clay, and traced the bottom of the body of the mug onto the clay. Then, I used a needle tool to cut it out. I scored the bottom of the mug and the base of the mug, the applied slip to stick them together. I "moved" the clay around in that area to remove the line. I wanted to make a more of a unique mug, so I decided to squish the sides of the mug a bit. It turned out to be a pointy-ish mug. I am constantly fascinated by nature. So, I decided to make a volcano. As I stuck on lava onto the mug, I changed my mind and decided to go with a more humorous theme. I changed and made a person's head instead. The "lava" became hair. To make the hair, I rolled out clay, cut it, and flattened it. Then, I scored and slipped it onto the mug. I added eyes (glasses), a nose, and incised a mouth. I used circles and a tiny bit of clay to make the glasses and a ball of clay to make the nose. I scored and slipped those onto the mug. Then, I stuck a tongue in the mouth. I thought about making ears as the handle of the mug. Then it'll kind of be like a baby sippy cup with handles on the side. I thought it would be more interesting if I made a handle out of coils combined together. I rolled out thin pieces of coil and combined it together to form a handle. I attached the handle onto the side of the face. Finally, I polished up and smoothed it out. Then I left it out for it to reach bone-dry stage for it to fire in the kiln. I think it turned out pretty well.

This one was made mainly with adding clay and incising.


After it was fired in the kiln, I put glaze on it. (the diff. types of glaze i used you can read about in my sketchbook). Before putting it in the kiln, I made sure that the bottom was clear of glaze, or it would stick to the bottom of the kin. (ceramic golden rule) I made my project even worse. It looked like it had some kind of deadly skin disease. I caused it to have a skin disease because I didn't put the layers of glaze on very evenly. The places where it is darker is due to not putting enough glze on it. The hair and sunglasses and handle (I think) turned out okay, but the nose, tongue, and skin turned out kinda bad. After this, I learned to be more careful when glazing.

Sunday, March 1, 2015

Soft Slab Inspiration

I am continuously fascinated by nature. In one of my previous projects, I wanted to use a "seasons" theme, but I didn't. I might use that theme to make four mugs/cups, having each of them represent a season.

As I looked through images on Google, I found a few interesting mugs. One mug had designs around the rim. Another one had waveish textures on the main part of the mug. This inspired me to possibly do something similar and to not simply create a plain mug.

I found this site: http://www.veniceclayartists.com/ceramic-mug-shots/ . This blog contains the work of many different artists. The textures, shapes, and designs of the different mugs showcased inspired some of the designs I came up with for my own mug. I really like how a few of the artists mixed together glazes to create cool effects. Others had interesting mug shapes.

Soft Slab Introduction

Objectives:
  • To experiment with soft slabs to create a mug/cup
Materials:
  • Clay
  • Sponge
  • Watered-down clay (slip)
  • Ceramic tools
Procedure:
  1. Roll a slab of clay out
  2. Create a paper outline of the shape of clay you want to make and trace the shape out on the slab of clay
  3. OR stick a rolling pin through a ball of clay and roll out your mug
  4. Form your mug/cup
  5. Decorate it using decorating techniques