
Showing posts with label Coil Pot. Show all posts
Showing posts with label Coil Pot. Show all posts
Saturday, May 30, 2015
Coil Pot principles of design
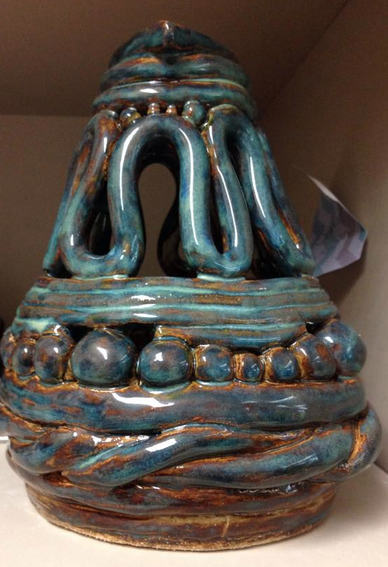
The principles of design influenced my project. For some of the layers in my coil pot I used the pattern design. For example, I made balls of clay of different sizes and repeated it as a pattern throughout the layer of the coil pot. Also, to balance the coil pot design out, I made thin coils and thick coils. Another principle of design I used was emphasis. I wanted to emphasize the squiggly coil layer, so I made it larger and put larger gaps in between the spaces to make it stand out more compared to the other coil layers. That also related to the principle of design of space

Monday, March 2, 2015
Coil Pot Reflection
What I Learnt
One of the main things I learned was how to use the extruder. It's pretty easy to use. All you do is put clay into the opening and push the lever down. However, cleaning it up and changing the template was more difficult. Secondly, when I wanted to bend my coils into different shapes, some of the time, it would end up cracking. That really annoyed and bothered me. So, I learned that before you bend the coils, you should wipe it down with a sponge. It cracked because as I rolled it, my hands would take away the moisture from the coils, making them more prone to cracking. For me, that reduced the risk of having cracks in the coil. Thirdly, I learnt that you need to have a solid base to build more layers. I wanted to put a squiggly coil design near the bottom, but Mr. Swinehart advised that I put it near the top because it may not be able to support a lot of weight. It is important to take into account the placement of the coils. Lastly, I learnt that I should be more accurate when working with coils. I made a squiggly coil design, but the squiggles weren't all the same height. As a result, I had to fill up the empty spaces with other designs.
Design Reflection
I wanted to integrate my design as a part of the coils. I didn't put any extra designs on the outside. I didn't incise, excise, carve, or add clay onto the pot. I had a few coil ideas I wanted to integrate into the pot. A few of them were - the squiggly design, a braided design, and balls of clay. Originally, I wanted to use 3 coils and braid them into a single, larger coil. However, as I tried to braid the coils, it started cracking a lot, so I stuck with two and simply twisted them. Also, I originally planned on making the layer of balls of clay all the same size. But, I thought it would be more interesting if I made them different sizes. Some of the other layers on my pot were more like "stabilization" layers. Those coils are supposed to make the pot more stable and not as flimsy. Some layers of my coil pot were thought of carefully, and others were created in a spur.

(Note: vocab is integrated into the process)
One of the main things I learned was how to use the extruder. It's pretty easy to use. All you do is put clay into the opening and push the lever down. However, cleaning it up and changing the template was more difficult. Secondly, when I wanted to bend my coils into different shapes, some of the time, it would end up cracking. That really annoyed and bothered me. So, I learned that before you bend the coils, you should wipe it down with a sponge. It cracked because as I rolled it, my hands would take away the moisture from the coils, making them more prone to cracking. For me, that reduced the risk of having cracks in the coil. Thirdly, I learnt that you need to have a solid base to build more layers. I wanted to put a squiggly coil design near the bottom, but Mr. Swinehart advised that I put it near the top because it may not be able to support a lot of weight. It is important to take into account the placement of the coils. Lastly, I learnt that I should be more accurate when working with coils. I made a squiggly coil design, but the squiggles weren't all the same height. As a result, I had to fill up the empty spaces with other designs.
Design Reflection
I wanted to integrate my design as a part of the coils. I didn't put any extra designs on the outside. I didn't incise, excise, carve, or add clay onto the pot. I had a few coil ideas I wanted to integrate into the pot. A few of them were - the squiggly design, a braided design, and balls of clay. Originally, I wanted to use 3 coils and braid them into a single, larger coil. However, as I tried to braid the coils, it started cracking a lot, so I stuck with two and simply twisted them. Also, I originally planned on making the layer of balls of clay all the same size. But, I thought it would be more interesting if I made them different sizes. Some of the other layers on my pot were more like "stabilization" layers. Those coils are supposed to make the pot more stable and not as flimsy. Some layers of my coil pot were thought of carefully, and others were created in a spur.
(Note: vocab is integrated into the process)
Friday, February 27, 2015
Coil Pot Progress (February 27, 2015)
I spent some time cleaning up my pot. I started with the lower layers and removed excess bits of clay that made the pot look messy using the needle tool, the ribbon tool, and a metal knife. I worked my way upward. It was difficult to clean the inside of the pot up because there were small openings. I cleaned most of the outside out and set it out to reach the bone-dry stage before firing it in the kiln. Everytime after I work I would clean up my work area because long exposure to clay dust can be bad for your health (ceramics golden rule).

Monday, February 9, 2015
Coil Pot Process (February 9, 2015)
From where I left off, I had three layers. I added two more layers on. The fourth layer was a simple coil. I rolled it out by hand. However, I accidentally applied too much pressure, and it ended up being a little flat. But, I liked the flat texture of the coil. So I flattened the coil a little more, scored it and the base, and applied slip to it and the base, and stuck it on. After that, I made a layer of balls. Originally, I decided that I was going to make the balls the same height and size, but in the end, I changed the design and made balls that gradually increased in size and decreased in size. I did that for the entire layer, so it ended up kind of like "waves".

After that, during today's class, I used the new extruder (yay!) to create coils. I used a template that extruded three smaller coils that were stuck together. Difficult to describe. And sorry, I'll put pictures on here later. That coil turned out a little bad. It had air holes in it, so some parts were not usable. Next time, I should wedge it before putting it in the extruder. Anyways, because of the "waviness" of the balls, there are going to be gaps in between the balls and the coil. So, I used a thin coil to fill in the gaps. I scored and slipped that onto the balls. After that, I scored and slipped the "3-in-1" coil on top of the balls and the thin coils, making that the 6th layer, I think.
I really need to smooth out my pot. There are many bits of clay that make the pot look messy.

Tuesday, February 3, 2015
Coil Pot Process (February 3, 2015)
Okay, so for the past few classes, I have been working on a coil pot. First, I had to create a base. I used a rolled up slab of clay. After that, I used a plastic bowl and used a needle tool to trace around it. Then, I started to roll out my coils. I'm a fussy person that likes my coils to be smooth, so I would spend quite some time rolling them out. And if I see cracks in it, I try to patch it up as soon as possible. Anyways, over the span of two classes, I rolled out 2 coils, attached them, and used the extruder to also "squeeze" out a really long coil. Well how do you attach coils onto the base or onto other coils? It's not very difficult. First, you have to cut out the desired length of your coil. Then, using either a needle tool or fork (I prefer the needle tool), mark up (score) both the base/coil and the coil you want to put on. That way, the clay can stick together better. Then, use some slip and spread it along the marked up areas. Place the coils together, and smooth the inside part of the pot to make it more sturdy. That's pretty much it. With the coil from the extruder, I looped it. I plan on putting balls of clay in the holes. Sadly, the extruder is broken (again), and I was back to rolling out my own coils. Fortunately, I was able to get one coil out of it. The next class, when I took my pot out of the bag, I noticed cracks along the pot. I think the cracks formed because of the moisture. The base is not sturdy enough, so when I carried it , I may have pushed the base upward, causing the crack. Anyways, I rolled out two thinner coils and twisted them together to form a braid-like thing. I wanted to make a braid out of three coils, but it was difficult to get the coils thin, as I am not very experienced with clay. Two coils turned out okay, but there were cracks along the areas that I bent. I'm pretty sure that my hands dried the clay out as I rolled it. So, I "patched" the holes up with wet clay. Sorry, I don't have a picture of that yet. I scored and slipped that onto the coil. So right now, I have 3 layers. I plan on making 5 more layers. The number of layers depends on the speed I will work at and the time I have.


Thursday, January 29, 2015
Coil Pot Inspiration
An artist on Deviant Art created a bird coil pot. They creatively used coils to form a wing. I found it very interesting. The pot was not a common pot that was all symmetrical. It placed emphasis on the wing by having it stick out. Perhaps, when I make my own coil pot, I don't necessarily have to make it symmetrical.

Peter Garrand is a ceramic artist. One of the things he specializes in is coil pots. He makes swirls out of them and combines the swirls together to for a pot. In my pot, I want to integrate that with other coiling techniques to form a pot.


Peter Garrand is a ceramic artist. One of the things he specializes in is coil pots. He makes swirls out of them and combines the swirls together to for a pot. In my pot, I want to integrate that with other coiling techniques to form a pot.

Pinterest, again, has a lot of interesting coil pot designs created by different artists. Some of them have themes, such as an ocean/undersea theme. Others are more elegant, and other ones have more swirls.


Coil Pot Introduction
Objectives:
- To experiment with the coil method to create a pot
- Clay
- Sponge
- Watered-down clay (slip)
- Ceramic tools
Procedure:
- Roll a slab of clay out
- Use a circular object to trace out the base
- Wedge a piece of clay to remove any air in it
- Stretch the clay out, then roll it out into coils in the thickness you want it to be
- When connecting the coils, score and slip
- Smooth out the inside and/or outside to connect the clay together
Subscribe to:
Posts (Atom)